Creating a Gatsby Site with WordPress Data
Publikováno: 20.7.2020
In my previous article last week, I mentioned creating a partially ported WordPress-Gatsby site. This article is a continuation with a step-by-step walkthrough under the hood.
Gatsby, a React-based framework for static sites, is attracting attention not only from JavaScript developers but also from the WordPress developers and users. Many WordPress users find its features appealing, like ultra fast image handling and improved security protection from hackers, but would like to use them while continuing to use the … Read article “Creating a Gatsby Site with WordPress Data”
The post Creating a Gatsby Site with WordPress Data appeared first on CSS-Tricks.
You can support CSS-Tricks by being an MVP Supporter.
In my previous article last week, I mentioned creating a partially ported WordPress-Gatsby site. This article is a continuation with a step-by-step walkthrough under the hood.
Gatsby, a React-based framework for static sites, is attracting attention not only from JavaScript developers but also from the WordPress developers and users. Many WordPress users find its features appealing, like ultra fast image handling and improved security protection from hackers, but would like to use them while continuing to use the WordPress admin and editor to manage content.
Chris has covered the idea of combining Gatsby and WordPress before here on CSS-Tricks. As a WordPress enthusiast, I decided to give it a try. This article is based on what I learned and documented along the way.
Please note that WPGraphQL and gatsby-cli are in constant development with breaking changes in later versions. This project was done using WPGraphQL 0.8.3, gatsby-source-wpgraphql 2.5.1 and gatsby-cli 2.12.21. Unlike WordPress, newer WPGraphQL releases do not support backward compatibility. Please consult the official WPGraphQL & Gatsby doc for the latest changes and proceed with caution before using.
There are ready-to-use projects in the Gatsby starters library. Two great examples are Alexandra Spalato’s gatsby-wordpress-theme-blog and the twenty-nineteen-gatsby-theme by Zac Gordon and Muhammad Muhsin.
Prerequisites
If you want to follow along, here’s what you’ll need:
- Basic familiarity of React and JavaScript. Here are getting started guides for React and JavaScript.
- Basic understanding of Gatsby and how dynamic pages are created. Here is a link to an excellent step-by-step tutorial guide to learn Gatsby.
- Familiarity with WordPress and a working installation. Here are guides to help get you started.
Assets and resources
Because I had already done a few Gatsby learning projects in the past, I had some assets like typography, layouts, and other reusable components that I could apply here. I had also gone through the following recent tutorial guides, which helped me to prepare for this project.
- Overview – Guide to Gatsby WordPress Starter Advanced with Previews, i18n and more by Henrik Wirth
- Migrate Your WordPress Site to the Jamstack by Jason Lenstorf
- Porting the Twenty Nineteen WordPress Theme to Gatsby by Muhammad Muhsin
Henrick Wirth’s guide is super comprehension and thorough. Jason’s step-by-step article is a great resource and even includes super helpful videos that help see the process take place. Muhammad’s article helps explain how static pages are created with Gatsby’s createPages API and breaks down various functions, template files and React components along the way.
I largely followed Henrik’s guide and divided this article into similar sections. Henrik’s guide includes image handling and adding PageBuilder with ACF Flexible Content features which we don’t get into here.
Section 1: Setting up WordPress and Gatsby
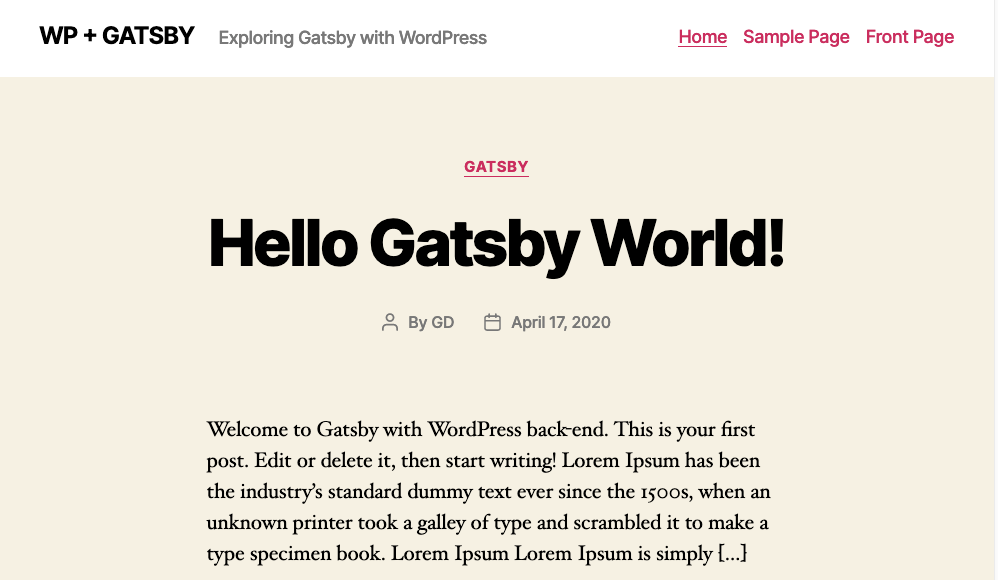
First, let’s set up a WordPress site for a data source. This could be an already existing site or a fresh one. Even a local WordPress installation is fine. I decided to start with a new test WordPress site for this project using the Twenty Twenty theme that ships with WordPress.
Install the WPGraphQL and WPGraphiQL plugins
Let’s start by installing a couple of plugins in WordPress. We’ll use WPGraphQL to enable GraphQL API in WordPress and open up WordPress as a data source. We’ll also use WPGraphiQL (note the “i” in the name). This one is actually optional, but it creates an interface for testing GraphQL queries directly in the WordPress dashboard, which is super handy. You may notice that I’m linking to the GitHub repos for the plugins instead of the WordPress Plugin Directory and that’s intentional — neither plugin is available in the directory at the time of this writing. As such, you’ll download the ZIP files and manually install them in WordPress via the /wp-content/plugins directory.
Once activated, the GraphiQL API is displayed in the WordPress dashboard.

The GraphiQL API provides a playground to test GraphQL queries from WordPress site.

Setting up a local Gatsby site
We will setup a local Gatsby site by installing Gatsby’s starter default in the wordpress-gatsby directory of the project with this in the command line:
#! create a new Gatsby site using the default starter
gatsby new wordpress-gatsby https://github.com/gatsbyjs/gatsby-starter-default
Restart the server with gatsby develop, then let’s navigate to localhost:8000 in a new browser tab. We should get a starter page in the browser.

A link to how to create a gatsby site locally is available from the Gatsby documentation.
Next, we’re going to install and configure the gatsby-source-graphql plugin. Just as we did when setting up WordPress, we have to install and configure WPGraphQL in the Gatsby site.
#! install wpgraphql plugin
#! add with yarn
yarn add gatsby-source-graphql
#! install with npm
npm install --save gatsby-source-graphql
OK, now it’s time to configure the gatsby-source-graphql plugin. Open up the gatsby-config.js file and let’s use these settings:
// plugin configuration
module.exports = {
  plugins: [
    {
      resolve: "gatsby-source-graphql",
      options: {
        typeName: "WPGraphQL",
        fieldName: "wpcontent",
        // GraphQL endpoint, relative to your WordPress home URL.
        url: "https://tinjurewp.com/wp-gatsby/graphql",
        // GraphQL endpoint using env variable
       // url: "${process.env.WORDPRESS_URL}/graphql",
      },
    },
  ],
}
How did I come up with this exact configuration? I strictly followed what’s described in the Gatsby docs. The plugin was added to the Gatsby instance by specifying the URL of the GraphQL endpoint (highlighted above) and two configuration options: typeName, a remote schema query type, and fieldName, which is available in the Gatsby query. Please note, the latest WPGraphQL doc suggest using fieldName: "wpcontent" instead of "wpgraphql"as described in the guide.
Alternative setup: Use the dotenv module
Optionally, we could have set things up using the dotenvnpm module to define environment variables that are used to customize the development environment. Henrik uses this method in his guide as well.
If you’re using this method, a variable in the .env.production plugin configuration file, like WORDPRESS_URL, can be defined and used instead of exposing the WordPress URL.
# .env.production
# Don't put any sensible data here!!!
WORDPRESS_URL=https://tinjurewp.com/wp-gatsby/
My test environment equally exposes the WordPress instance and data to WPGraphQL.
Colby Fayock has a helpful step-by-step guide on using environmental variables with Gatsby and Netlify.
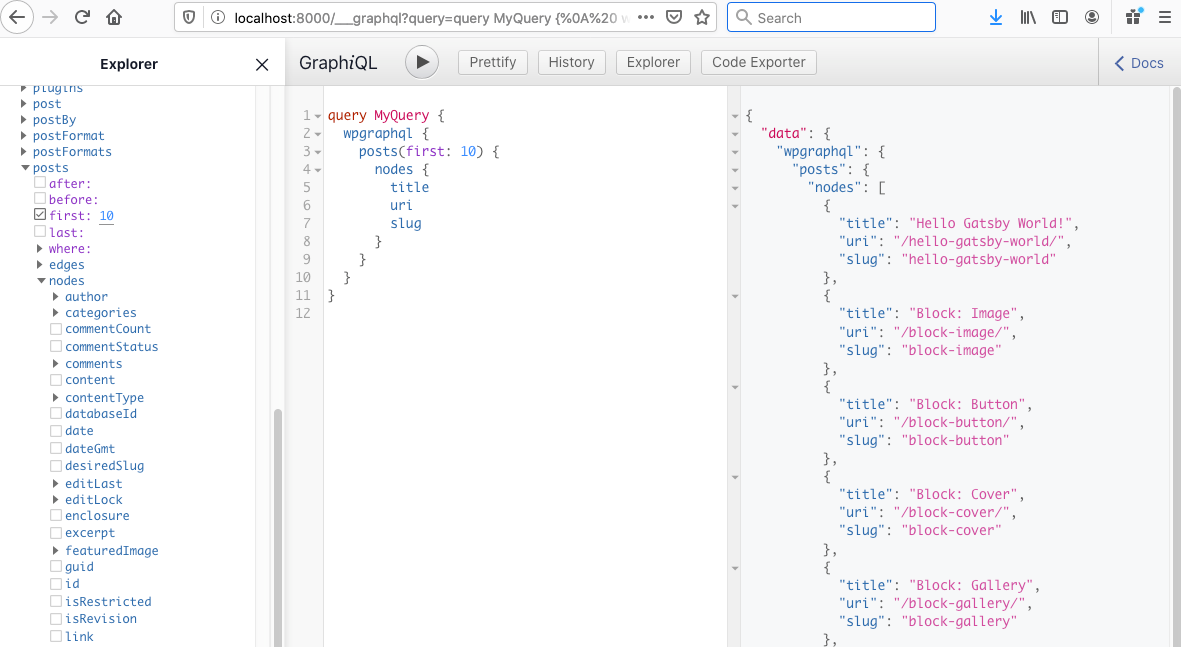
After re-starting the development server, the WPGraphQL API is available with Gatsby to query and retrieve the specific data that’s queried from the WordPress site and display it on a Gatsby site through the localhost GraphQL URL at https//localhost:8000/___graphql/.
Section 2: Porting posts and pages from WordPress
In Gatsby, posts and pages can be created at build time by querying data with GraphQL and mapping the query results to posts or page templates. The process is described in a Gatsby tutorial on programmatically creating pages from data. Gatsby make use of two APIs, onCreateNode and createPages, and tutorial contains a detailed explanation on how they are implemented.
The code snippets here come from Henrik’s guide. Because of the way WordPress stores data in its database under different data types and categories, porting all the contents turns out to be less than straightforward. However, with prior knowledge of creating pages and posts with Gatsby createPages API and Node API, I was able to follow along. There’s also a lot of real-world starter sites that can be referenced as examples.
Step 1: Add posts and pages content in a WordPress site
Add some posts and pages in WordPress site if you don’t have any already. Before creating page for that content, we need to delete index.js and page-2.js from the pages folder of the Gatsby site. These two files seem to interfere with the ported WordPress data.
Step 2: Create page and post template
We’re going to create two template files for our content, one for posts (/src/templates/posts/index.js) and one for pages (/src/templates/pages/index.js).
Here’s our post template. Basically, we’re using the post title twice (one as the SEO page title and one as the post heading) and the post content as a Post component.
// src/templates/post/index.js
import React  from "react"
import Layout from "../../components/layout"
import SEO from "../../components/SEO"


const Post = ({ pageContext }) => {
  const post = pageContext.post


  return (
    <Layout>
      <SEO title={post.title} />


      <h1> {post.title} </h1>
      <div dangerouslySetInnerHTML={{__html: post.content}} />


    </Layout>
  )
}


export default Post
We’ll do nearly the same thing for the page template:
//src/templates/pages/index.js

import React  from "react"
import Layout from "../../components/layout"
import SEO from "../../components/seo"


const Page = ({ pageContext }) => {
  const page = pageContext.page


  return (
    <Layout>
      <SEO title={page.title} />


      <h1>{page.title}</h1>
      <div dangerouslySetInnerHTML={{__html: page.content}} />


    </Layout>
  )
}


export default Page
Step 3: Create static posts and pages with the createPages API
Note that the entire code we’re covering here can be written in the node.js file. However, for readability purposes, posts and pages are separated in a folder named create in the project’s root directory following Henrik’s Guide.
We’re going to get our hands dirty with the GraphQL createPages API! We’ll start by adding the following to gatsby-node.js.
// gatsby-node.js
const createPages = require("./create/createPages")
const createPosts = require("./create/createPosts")


 exports.createPagesStatefully = async ({ graphql, actions, reporter }, options) => {
  await createPages({ actions, graphql, reporter }, options)
  await createPosts({ actions, graphql, reporter }, options)
 }
Muhammad’s post makes a good point that’s worth calling out here:
The createPages API is part of the Node APIs that Gatsby exposes. It essentially instructs Gatsby to add pages. Within this we are calling some methods using
async/await(a feature of ECMAScript 2017).
In other words: both functions create relevant static pages. With that in mind, let’s define what data we want to use and fetch that data in the create/createPages.js file. Sorry for the big code dump, but Henrik’s comments help explain what’s happening.
//create/createPages.js
const pageTemplate = require.resolve('../src/templates/page/index.js');


const GET_PAGES = `
  query GET_PAGES($first:Int $after:String) {
    wpgraphql {
      pages(
        first: $first
        after: $after
        # This will make sure to only get the parent nodes and no children
        where: {
          parent: null
         }
      ) {
        pageInfo {
          hasNextPage
          endCursor
        }
        nodes {
          id
          title
          pageId
          content
          uri
          isFrontPage
        }
      }
    }
  }
`


const allPages = []
let pageNumber = 0
const itemsPerPage = 10


/** This is the export which Gatbsy will use to process.
 * @param { actions, graphql }
 * @returns {Promise<void>} */
module.exports = async ({ actions, graphql, reporter }, options) => {


  /** This is the method from Gatsby that we're going
   * to use to create pages in our static site. */
  const { createPage } = actions
  /** Fetch pages method. This accepts variables to alter
   * the query. The variable `first` controls how many items to
   * request per fetch and the `after` controls where to start in
   * the dataset.
   * @param variables
   * @returns {Promise<*>} */
  const fetchPages = async (variables) =>
    /** Fetch pages using the GET_PAGES query and the variables passed in. */
    await graphql(GET_PAGES, variables).then(({ data }) => {
      /** Extract the data from the GraphQL query results */
      const {
        wpgraphql: {
          pages: {
            nodes,
            pageInfo: { hasNextPage, endCursor },
          },
        },
      } = data


      /** Map over the pages for later creation */
      nodes
      && nodes.map((pages) => {
        allPages.push(pages)
      })


      /** If there's another page, fetch more
       * so we can have all the data we need. */
      if (hasNextPage) {
        pageNumber++
        reporter.info(`fetch page ${pageNumber} of pages...`)
        return fetchPages({ first: itemsPerPage, after: endCursor })
      }


      /** Once we're done, return all the pages
       * so we can create the necessary pages with
       * all the data on hand. */
      return allPages
    })


  /** Kick off our `fetchPages` method which will get us all
   * the pages we need to create individual pages. */
  await fetchPages({ first: itemsPerPage, after: null }).then((wpPages) => {


    wpPages && wpPages.map((page) => {
      let pagePath = `${page.uri}`


      /** If the page is the front page, the page path should not be the uri,
       * but the root path '/'. */
      if(page.isFrontPage) {
        pagePath = '/'
      }


      createPage({
        path: pagePath,
        component: pageTemplate,
        context: {
          page: page,
        },
      })


      reporter.info(`page created: ${page.uri}`)
    })


    reporter.info(`# -----> PAGES TOTAL: ${wpPages.length}`)
  })
}
Again, Muhammad’s post is excellent help because it breaks down what the createPages.js and createPosts.js functions can do. Henrik’s guide also provides helpful comments for each step.
Step 4: Creating posts
The createPosts.js file is almost identical to createPages.js. The sole difference is prefixing the path with blog/ and replacing the “page” with “posts” throughout the code.
If we stop here and restart the development server with gatsby develop in the terminal, the develop log displays the page buildup.

Now, if we open up localhost:8000 in a browser, we get a 404 error.
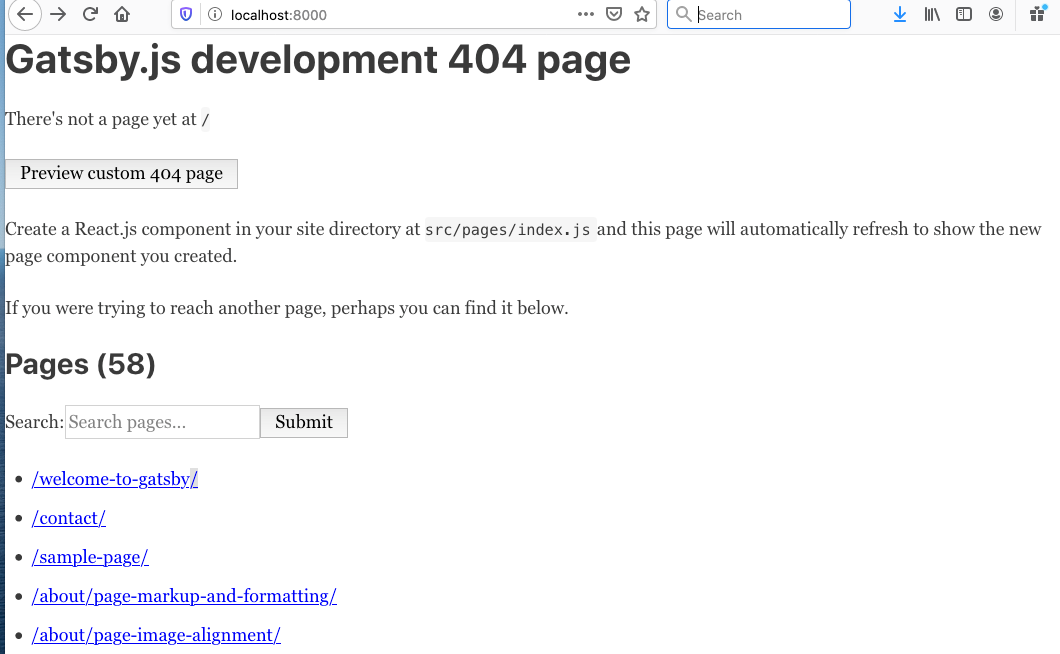
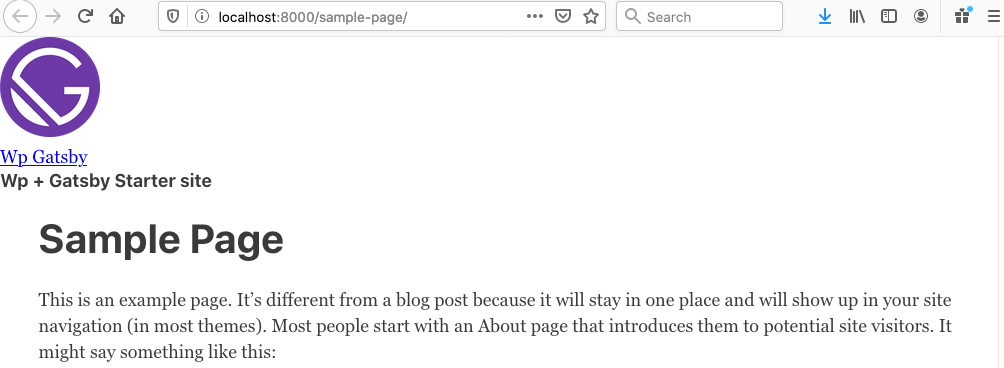
That might be off-putting, but it’s all good. Clicking any of the links on the 404 page displays the correct page or post from the WordPress data source. For example, if the sample-page link is clicked, it displays sample page content from WordPress in the browser.
Section 3: Working with navigation
Let’s move on to the navigation menu for our site. WordPress has a navigation management feature that allows us to construct menus using links to pages, posts, archives, taxonomies, and even custom links. We want to create navigation for a main menu in WordPress and send it to GraphQL where we can query it for our own site.
Navigation links — including page and post links — are created in Gatsby using the Gatsby Link API, which uses both the built-in <Link> component and navigate function. The <Link> component is used for linking to internal pages, but not to external links.
Porting navigation menu from the WordPress into Gatsby site turns out to be a tricky little task that requires creating <Menu> and <MenuItems> components and refactoring the <Layout> component accordingly. Here’s how that works.
Code snippets used in this section are taken directly from Henrik’s guide for completeness, however these code snippets appear to be pretty standard used in other Gatsby WordPress starters with little variation.
Step 1: Create a WordPress menu
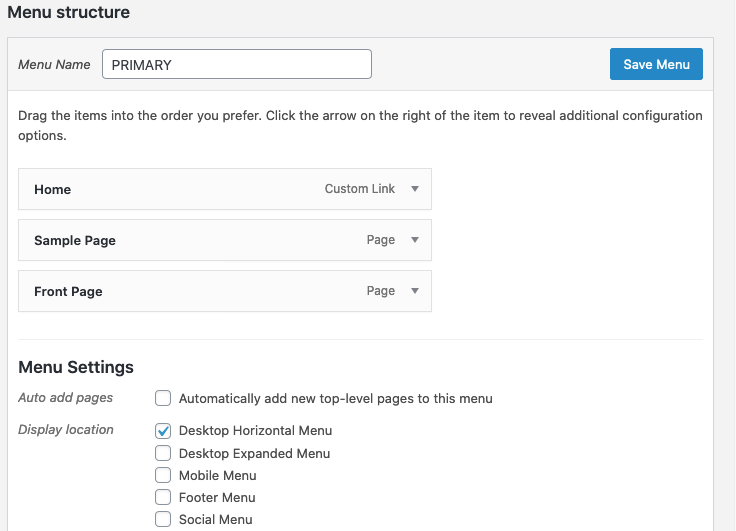
As described in the guide, it is important to set up a menu called “PRIMARY” which is defined in the Twenty Twenty theme. We’re going to toss three links in there:
- Home: A link to our homepage, which will be a custom link pointing to our site’s index.
- Sample Page: The default page that WordPress creates on a new WordPress installation.
- Front Page: This is typically the name given for the homepage in WordPress. You’ll need to create this page in the editor.
Step 2: Query Menu Items with GraphiQL Explorer
Next up, we’ll write a query for the menu items from the GraphiQL interface. Notice that we can use the explorer to practically write it for us by checking a few boxes.
query MyQuery {
  menuItems(where: {location: PRIMARY}) {
    nodes {
      label
      url
      title
      target
    }
  }
}
Step 3: Create menu and link utility components in Gatsby
See how the URLs in the data are absolute, displaying the full address? We’ll need a utility function to translate those to relative URLs, again, because that’s what the <Link> component supports.
Henrik’s guide provides the following utility function for converting absolute WordPress URLs to relative URLs that are required for Gatsby:
// src/utils/index.js
/** Parses a menu item object and returns Gatsby-field URI.
 * @param {object} menuItem a single menu item
 * @param wordPressUrl
 * @param blogURI */
export const CreateLocalLink = (menuItem, wordPressUrl, blogURI='blog/') => {
  const { url, connectedObject } = menuItem;


  if (url === '#') {
    return null;
  }
  /** Always want to pull of our API URL */
  let newUri = url.replace(wordPressUrl, '');


  /** If it's a blog link, respect the users blogURI setting */
  if (connectedObject && connectedObject.__typename === 'WPGraphQL_Post') {
    newUri = blogURI + newUri;
  }


  return newUri;
};
Step 4: Create a menu item component
The next step is to create a <MenuItem> component which utilizes the utility function created in the previous step. The result is a fully formed link that gets consumed by the Gatsby site menu.
// src/components/MenuItem.js
import React from "react"
import { CreateLocalLink } from "../utils"
import { Link } from "gatsby"


const MenuItem = ({ menuItem, wordPressUrl }) => {
  return (
    <Link style={{marginRight: '20px' }}
     to={CreateLocalLink(menuItem, wordPressUrl)}>
     {menuItem.label}
     </Link>
  )
}


export default MenuItem
Step 5: Creating a menu component
OK, we created URLs and a functional <MenuItem> component. Let’s create a new <Menu> component where our <MenuItem> components can go. The Gatsby StaticQuery API is used to query all primary menu items with GraphQL.
// src/components/Menu.js
import React from "react"
import { StaticQuery, graphql } from "gatsby"
import MenuItem from "./MenuItem"


/** Define MenuItem fragment and get all primary menu items */
const MENU_QUERY = graphql`
  fragment MenuItem on WPGraphQL_MenuItem {
    id
    label
    url
    title
    target
  }


  query GETMAINMENU {
    wpgraphql {
      menuItems(where: {location: PRIMARY}) {
        nodes {
          ...MenuItem
        }
      }
      generalSettings {
        url
      }
    }
  }
`


const Menu = () => {
  return (
    <StaticQuery
      query={MENU_QUERY}
      render={(data) => {
        if (data.wpgraphql.menuItems) {
          const menuItems = data.wpgraphql.menuItems.nodes
          const wordPressUrl = data.wpgraphql.generalSettings.url


       return (
         <div style={{ marginBottom: "20px" }}>
           {
             menuItems &&
             menuItems.map((menuItem) => (
               <MenuItem key={menuItem.id}
               menuItem={menuItem} wordPressUrl={wordPressUrl}/>
             )
           )}
         </div>
       )
      }
      return null
   }}
  />
  )
}


export default Menu
Step 6: Adding the menu to the layout component
At this point, we have everything we need to construct a Gatsby site menu using WordPress data. We just need to drop the <Menu> component into our <Layout> component:
// src/components/layout.js
import React from "react"
import PropTypes from "prop-types"
import useSiteMetadata from '../components/siteMetadata';
import Header from "./Header"
import Footer from "./Footer"
import Menu from "./Menu"
import "./layout.css"


const Layout = ({ children }) => {
  const { title, description } = useSiteMetadata();


  return (
    <section>
      <Header siteTitle={title} description={description} />
      <div
      style={{ margin: `0 auto`, maxWidth: 960,
               padding: `0 1.0875rem 1.45rem`,}}>
        <Menu />
        <main>{children}</main>
        <Footer />
      </div>
    </section>
  )
}


Layout.propTypes = {
  children: PropTypes.node.isRequired,
}


export default Layout
Step 7: Adding Support for External Link path
Gatsby’s documentation on the <Link> component explains that data coming from an external CMS, like WordPress, should ideally be inspected by the <Link> component and renders either with Gatsby’s <Link> or with a regular <a> tag accordingly. This ensures that any truly external links on the WordPress side remain absolute without conflicting the <Link> component.
This requires — you guessed it — another component that does exactly that. In Gatsby Docs it’s referred as <UniversalLink> which returns either a Gatsby-compatible <Link> component or a traditional <a> element:
//src/components/UniversalLink.js
import React from "react"
import { Link as GatsbyLink } from "gatsby"


const UniversalLink = ({ children, to, activeClassName, partiallyActive, ...other }) => {
  const internal = /^\/(?!\/)/.test(to)
  // Use Gatsby Link for internal links, and <a> for others
  if (internal) {
    return (
      <GatsbyLink
        to={to}
        activeClassName={activeClassName}
        partiallyActive={partiallyActive}
        {...other}
      >
        {children}
      </GatsbyLink>
    )
  }
  return (
    <a href={to} {...other}>
      {children}
    </a>
  )
}
export default UniversalLink
Now, let’s go back to our <MenuItem> component and update it to use the <UniversalLink>:
/ src/components/MenuItem.js
import React from "react"
import { CreateLocalLink } from "../utils"
import UniversalLink from "./UniversalLink"


const MenuItem = ({ menuItem, wordPressUrl }) => {
  return (
    <UniversalLink style={{marginRight: '20px' }}
      to={CreateLocalLink(menuItem, wordPressUrl)}>
      {menuItem.label}
    </UniversalLink>
  )
}


export default MenuItem
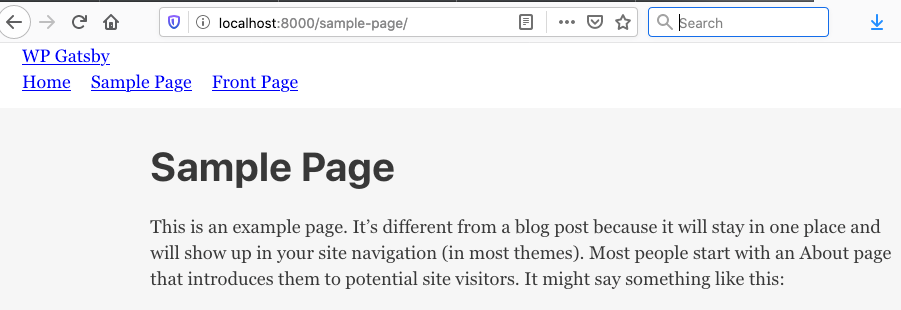
Are you ready to check things out? Restart the local server with gatsby develop and the browser should display a navigation menu with items that contain links to relative page paths.
Section 4: Displaying blog posts in Gatsby
We’re in pretty good shape at this point, but there’s a big piece we’ve gotta tackle: displaying pages on the site. We’ll walk through the steps to make that happen in this section, specifically by creating blog post templates as well as a couple of new components for post images before tying everything together in createPages.js and createPosts.js.
Have you already created your pages and posts in WordPress? If not, this is a good time to jump in there and do it.
Step 1: Add a globals variable file at the root of the project directory
// global variable
const Globals = {
  blogURI: ''
}
module.exports = Globals
The blogURI = ' ' URL path is used when the homepage setting in the WordPress admin (Settings → Reading) is set to the “Your latest posts” option.
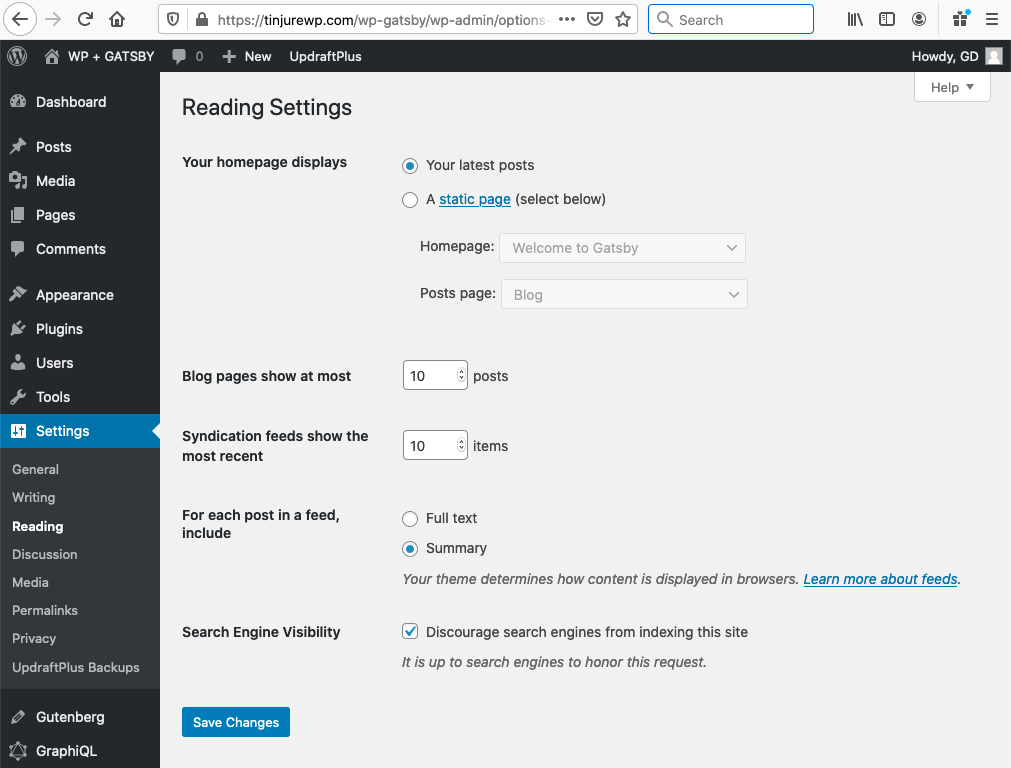
If you’re planning to use the “static page” option instead, then blogURI= 'blog' should be used in the global variables file.
Step 2: Create a blog template inside the templates folder
This template will handle displaying all published posts. Take note that two components — PostEntry and Pagination, both of which don’t exist yet) —are used here. We’ll get to those in just a moment.
// src/templates/post/blog.js
import React from "react"
import Layout from "../../components/Layout"
import PostEntry from "../../components/PostEntry"
import Pagination from "../../components/Pagination"
import SEO from "../../components/SEO"


const Blog = ({ pageContext }) => {
  const { nodes, pageNumber, hasNextPage, itemsPerPage, allPosts }
  = pageContext


  return (
    <Layout>
      <SEO
        title="Blog"
        description="Blog posts"
        keywords={[`blog`]}
      />
      {nodes && nodes.map(post => <PostEntry key={post.postId}
        post={post}/>)}
      <Pagination
        pageNumber={pageNumber}
        hasNextPage={hasNextPage}
        allPosts={allPosts}
        itemsPerPage={itemsPerPage}
      />
    </Layout>
  )
}


export default Blog
Step 3. Create a post entry component
This component is used within archive.js and other components to iterate through posts, displaying the post entry title, featured image (if any), excerpt and URL (aka “slug” in WordPress parlance).
// src/components/PostEntry.js
import React from "react"
import { Link } from "gatsby"
import Image from "./Image"
import { blogURI } from "../../globals"


const PostEntry = ({ post }) => {
  const { uri, title, featuredImage, excerpt } = post

  return (
    <div style={{ marginBottom: "30px" }}>
      <header>
        <Link to={`${blogURI}/${uri}/`}>
          <h2 style={{ marginBottom: "5px" }}>{title}</h2>
          <Image image={featuredImage} style={{ margin: 0 }}/>
        </Link>
      </header>


      <div dangerouslySetInnerHTML={{ __html: excerpt }}/>
    </div>
  )
}

export default PostEntry
Step 4: Create an (optional) image component
The Gatsby default starter comes with an Image component and that works just fine in most case. In this example, we’re fetching the image file used as the post’s featured image in WordPress and assign it a fallback image in case there is no featured image as described in Henrik’s guide.
// src/components/Image.js
import React from "react"
import { useStaticQuery, graphql } from "gatsby"


const Image = ({ image, withFallback = false, ...props }) => {
  const data = useStaticQuery(graphql`
    query {
      fallBackImage: file(relativePath: { eq: "fallback.svg" }) {
        publicURL
      }
    }
  `)


  /* Fallback image */
  if (!image) {
    return withFallback ? <img src={data.fallBackImage.publicURL}
      alt={"Fallback"} {...props}/> : null
  }


  return <img src={image.sourceUrl} alt={image.altText} {...props}/>
}


export default Image
If withFallback is set to false (like it is in the default Gatsby component file), then it will simply not render a DOM element.
Step 5: Create a Pagination component
The Pagination component allows us to display specified number of posts per page in the post index. WordPress has two types of pagination one that returns Next and Previous links to navigate between pages one at a time, and one that provides linked page numbers. We’re working with the former in this component:
// src/components/Pagination.js
import React from "react"
import { Link } from "gatsby"
import { blogURI } from "../../globals"


const Pagination = ({ pageNumber, hasNextPage }) => {
  if (pageNumber === 1 && !hasNextPage) return null


  return (
    <div style={{ margin: "60px auto 20px", textAlign: "center" }}>
      <div className="nav-links">
        {
          pageNumber > 1 && (
            <Link
              className="prev page-numbers"
              style={{
                padding: "8px 8px 5px 4px",
              }}
           to={pageNumber > 2 ? `${blogURI}/page/${pageNumber - 1}`: `${blogURI}/`}
            >
              ← <span> Previous</span>
            </Link>
          )
        }
          <span className="meta-nav screen-reader-text"></span>
          {pageNumber}
        </span>


        {
          hasNextPage && (
            <Link
              style={{
                padding: "4px 8px 5px 8px",
              }}
              className="next page-numbers"
              to={`${blogURI}/page/${pageNumber + 1}`
              }
            >
              <span>Next </span> →
            </Link>
          )
        }
      </div>
    </div>
  )
}


export default Pagination
There is a conditional statement on Line 7 that returns null if pageNumber === 1 && !hasNextPage. In other words, if the current page’s hasPageNumber is greater than 1, the Previous button (Lines 13-24) will display. Similarly, when the current page’s hasNextPage is at least 1, then the Next button (Lines 30-42) will display.
Step 6: Refactoring createPages
We need to clean up the createPages.js file to reflect all the work we’ve done since creating the file. The file simply becomes too big with everything it’s tracking. To keep our code organized and structured, we can use GraphQL fragments, which allow us “to split up complex queries into smaller, easier to understand components,” according to the documentation.
GraphQL fragments are reusable units which allows to construct sets of fields, and then include them in queries wherever needed.
If we follow Henrik’s guide, the GraphQL query fields for the post template and post preview are stored in the data.js file:
// src/templates/posts/data.js
const PostTemplateFragment = `
  fragment PostTemplateFragment on WPGraphQL_Post {
    id
    postId
    title
    content
    link
    featuredImage {
      sourceUrl
    }
    categories {
      nodes {
        name
        slug
        id
      }
    }
    tags {
      nodes {
        slug
        name
        id
      }
    }
    author {
      name
      slug
    }
  }
`


const BlogPreviewFragment = `
  fragment BlogPreviewFragment on WPGraphQL_Post {
    id
    postId
    title
    uri
    date
    slug
    excerpt
    content
    featuredImage {
      sourceUrl
    }
    author {
      name
      slug
    }
  }
`


module.exports.PostTemplateFragment = PostTemplateFragment
module.exports.BlogPreviewFragment = BlogPreviewFragment
Next, refactoring the create/createPosts.js file as described in the guide requires adding the following code at the top section of createPosts.js (Lines 2-10), just above the const = GET_POSTS=` query statement on Line 4.
// create/createPosts.js
const {
  PostTemplateFragment,
  BlogPreviewFragment,
} = require("../src/templates/posts/data.js")


const { blogURI } = require("../globals")


const postTemplate = require.resolve("../src/templates/posts/index.js")
const blogTemplate = require.resolve("../src/templates/posts/blog.js")


const GET_POSTS = `
  # Here we make use of the imported fragments which are referenced above
  ${PostTemplateFragment}
  ${BlogPreviewFragment}
  query GET_POSTS($first:Int $after:String) {
    wpgraphql {
      posts(
       first: $first
       after: $after
       # This will make sure to only get the parent nodes and no children
       where: {
         parent: null
       }
      ) {
         pageInfo {
           hasNextPage
           endCursor
         }
         nodes {
           uri


           # This is the fragment used for the Post Template
           ...PostTemplateFragment


           #This is the fragment used for the blog preview on archive pages
          ...BlogPreviewFragment
        }
      }
    }
 }
`
Here, the fragment strings created in the previous steps (Lines 9-10) are imported and registered outside the GET_POSTS query (Line 12) and used as fragments (Lines 34 and 37 ) inside the GET_POSTS($first:Int $after:String) query.
At the bottom of the createPosts.js file, the blogPage path is defined with global blogURI variable (Lines 36-41) and we’ve added the code to create paginated blog pages (Lines 99-111).
// create/createPosts.js
// Previous code excluded


const allPosts = []
const blogPages = [];
let pageNumber = 0;
const itemsPerPage = 10;


/** This is the export which Gatbsy will use to process.
 * @param { actions, graphql }
 * @returns {Promise<void>} */
module.exports = async ({ actions, graphql, reporter }, options) => {


  /** This is the method from Gatsby that we're going
   * to use to create posts in our static site */
  const { createPage } = actions


  /** Fetch posts method. This accepts variables to alter
   * the query. The variable `first` controls how many items to
   * request per fetch and the `after` controls where to start in
   * the dataset.
   * @param variables
   * @returns {Promise<*>} */
  const fetchPosts = async (variables) =>
    /** Fetch posts using the GET_POSTS query and the variables passed in */
    await graphql(GET_POSTS, variables).then(({ data }) => {
      /** Extract the data from the GraphQL query results */
      const {
        wpgraphql: {
          posts: {
            nodes,
            pageInfo: { hasNextPage, endCursor },
          },
        },
      } = data


      /** Define the path for the paginated blog page.
       * This is the url the page will live at
       * @type {string} */
      const blogPagePath = !variables.after
        ? `${blogURI}/`
        : `${blogURI}/page/${pageNumber + 1}`


      /** Add config for the blogPage to the blogPage array for creating later
       * @type {{
       *   path: string,
       *   component: string,
       *   context: {nodes: *, pageNumber: number, hasNextPage: *} }} */
      blogPages[pageNumber] = {
        path: blogPagePath,
        component: blogTemplate,
        context: {
          nodes,
          pageNumber: pageNumber + 1,
          hasNextPage,
          itemsPerPage,
          allPosts,
        },
      }


      /** Map over the posts for later creation */
      nodes
      && nodes.map((posts) => {
        allPosts.push(posts)
      })


     /** If there's another post, fetch more so we can have all the data we need */
      if (hasNextPage) {
        pageNumber++
        reporter.info(`fetch post ${pageNumber} of posts...`)
        return fetchPosts({ first: itemsPerPage, after: endCursor })
      }


      /** Once we're done, return all the posts so we can
       * create the necessary posts with all the data on hand */
      return allPosts
    })


  /** Kick off our `fetchPosts` method which will get us all
   * the posts we need to create individual posts */
  await fetchPosts({ first: itemsPerPage, after: null }).then((wpPosts) => {


    wpPosts && wpPosts.map((post) => {
      /** Build post path based of theme blogURI setting */
      const path = `${blogURI}${post.uri}`


      createPage({
        path: path,
        component: postTemplate,
        context: {
          post: post,
        },
      })


      reporter.info(`post created:  ${path}`)
    })


    reporter.info(`# -----> POSTS TOTAL: ${wpPosts.length}`)


    /** Map over the `blogPages` array to create the
     * paginated blog pages */
    blogPages
    && blogPages.map((blogPage) => {
      if (blogPage.context.pageNumber === 1) {
        blogPage.context.publisher = true;
        blogPage.context.label = blogPage.path.replace('/', '');
      }
      createPage(blogPage);
      reporter.info(`created blog archive page ${blogPage.context.pageNumber}`);
    });
  })
}
The final updated create/createPosts.js and create/createPage.js files are available in this GitHub repository.
In his Twenty Nineteen porting tutorial post, Muhammad describes in great detail how static pages created with Gatsby’s createPage use nearly the same code and file structure used in this example. Nice to see some consistency forming between our references.
After re-starting local server with gatsby develop, we should display a screen in our browser now showing a loop of our published posts, containing the post title and excerpt.

Section 5: Styling and deployment
While styling, typography and deployment are all beyond the scope of what we’re covering here, we can touch on them a bit. The Gatsby’s documentation provides excellent resources on both styling and deployment/hosting options.
Basic site styling
Gatsby’s documentation is grouped by global CSS files, modular stylesheets and CSS-in-JS. There are other styling options available, including Typograpgy.js, Sass, JSS, Stylus and PostCSS.
While porting the Twenty Nineteen WordPress theme to Gatsby, Muhammad includes the theme’s styles so they can be used over on the Gatsby site. He cautions that some adjustments are needed since some units and values are incompatible with Gatsby. For example, he had to adjust vw units in CSS to use them with flexbox for some components. Similarly, porting Twenty Twenty theme to Gatsby, Henrik followed a similar process in his Gatsby starter -Twenty Twenty by porting over the Twenty Twenty stylesheet as well as fonts.
I decided to use Sass in my project. That requires installing gatsby-plugin-sass and its required node-sass dependency:
#! install node-sass & gatsby-sass
yarn add node-sass gatsby-plugin-sass
#! or with npm
npm install --save node-sass gatsby-plugin-sass
Then the plugin can be added to gatsby-config.js and configured as shown here.
// gatsby-config.js
module.exports = {
  siteMetadata: {
    plugins: [
      `gatsby-plugin-sass`
    ],
  }
}
Now we can write styles in .scss files and import them as we normally would in any other Sass project.
// using import in a component file
import("./src/styles/global.scss")


// using require in the gatsby-browser.js file
require('./src/styles/global.scss')
The .scss stylesheet can be imported by the global <Layout> component or added in gatsby-browser.js with a require statement. For this demo project, I’m using Gatsby’s default styling for the main page and I simply left post content as is. I refactored the Header.js file a bit with some very basic styling.
//src/components/Header.js
import { Link } from "gatsby"
import PropTypes from "prop-types"
import React from "react"
import useSiteMetadata from '../components/siteMetadata';
import Menu from "./Menu"
import "../styles/header.css"


const Header = () =>{
  const { title } = useSiteMetadata();


  return (
    <header className="header">
      <div className="nav-container brand">
        <Link  to="/"> {title} </Link>
        {/* Menu here */}
        <Menu />
      </div>
    </header>
  )
}


Header.propTypes = {
  siteTitle: PropTypes.string,
  description: PropTypes.string,
}


Header.defaultProps = {
  siteTitle: ``,
  description: ``,
}


export default Header
This should give us the site header when we restart the server with gatsby develop.

Supporting WordPress block styles
I’m assuming you’re well familiar with the WordPress block editor if you’ve made it this far and know how blocks generally work. Since releasing the block editor, WordPress has maintained a separate set of styles specifically for block content.
That means we need an extra step to port those over to Gatsby with the theme styles. Jason Lengstorf demonstrates in his tutorial guide. First, the WordPress blocks package is installed:
# install wordpress/block-library
npm install @wordpress/block-library
# with yarn add
yarn add @wordpress/block-library
Then we can import those styles into a Gatsby component. Let’s go with the <Layout> component:
// src/components/layout.js
import React from "react"
  import { Link } from "gatsby"


import "@wordpress/block-library/build-style/style.css"
  import "../styles/layout.css"


const Layout = ({ children }) => {
  return (
    <section>
      <header>
        <Link to="/" className="home">
          Gatsby + WP
        </Link>
      </header>
      <main>{children}</main>
    </section>
  )
}


export default Layout
The block editor is still very much in active development, which means things are prone to change, perhaps unexpectedly. So, definitely proceed with caution if you’re planning to use them.
Site deployment
We’ve talked a bit about deployment when I explained why I chose Netlify, I chose it because it hooks into the project’s GitHub repo and deploys automatically when pushing to a specific branch, thanks to Netlify Functions.
Netlify has a nice steop-by-step guide that covers how to connect a Gatsby site to Netlify. The Gatsby Doc also describes deploying to Netlify.
Finally, link to my own Netlify deployed demo site.
Again, this gives us continuous deployment where the site rebuilds automatically when changes are pushed to the repo. If we want a similar process whenever changes are made in WordPress — like publishing a post or editing a page — then the JAMstack Deployments plugin can be used as described in Jason’s guide.
This is still a work in progress!
While what I’ve learned in the process of porting a WordPress theme to Gatsby is great for constructing the basic building blocks of a blog, I’ve realized that there is still a lot of work to cover. I mean, WordPress stores so much data, including authors, categories, tags, post statuses, custom post types, and so much more, that all take extra consideration.
But there’s a growing list of decoupled Gatsby WordPress site examples, some of which I’ll list below for reference. Henrik’s an awesome list of WordPress-Gatsby resources is super helpful to learn more about the WordPress-Gatsby decoupling.
- twentynineteen-gatsby-theme (demo site)
- gatsby-starter (demo site)
- Gatsby WordPress theme blog (demo site)
- gatsby-theme-wp-source-one
- An awesome list of WordPress-Gatsby resources by Henrik Wirth (view on GitHub)
- GitHub – Discussion on future of WordPress with Gatsby by Tyler Barnes
Credits
I know I mentioned it throughout this post, but a big shout out to Henrick Wirth, Jason Lengstorf and Muhammad Muhsin for all the work they’ve done to document and share what it takes to port WordPress to Gatsby. Everything I’ve covered here is merely the accumulation of their fine work and I appreciate each of them for creating such helpful guides suitable even for beginners like myself. I owe a special thank you to our own Geoff Graham from CSS-Tricks for editing this article.
The post Creating a Gatsby Site with WordPress Data appeared first on CSS-Tricks.
You can support CSS-Tricks by being an MVP Supporter.