Optimizing Images for Users with Slow Network Speeds
Publikováno: 7.11.2019
For every website, page load time is a critical factor that can make or break the business. Thanks to the better user experience that comes with a fast-loading webpage, those who focus on page load optimization enjoy better conversion rates, better SEO, better retention, and lower bounce rates.
And this fact has been highlighted in several studies. For example, according to one of the studies, 47% of consumers expect a web page to load in 2 seconds or less. No … Read article
The post Optimizing Images for Users with Slow Network Speeds appeared first on CSS-Tricks.
For every website, page load time is a critical factor that can make or break the business. Thanks to the better user experience that comes with a fast-loading webpage, those who focus on page load optimization enjoy better conversion rates, better SEO, better retention, and lower bounce rates.
And this fact has been highlighted in several studies. For example, according to one of the studies, 47% of consumers expect a web page to load in 2 seconds or less. No wonder that developers across the globe focus a lot on improving the webpage load time.
Logic dictates that keeping other factors the same, a lighter webpage should load faster than a heavier webpage, and that is the direction in which our webpages should head too. However, contrary to that logic, our websites have become heavier over the years. A look at data from HTTP Archive reveals that an average webpage in 2017 was almost three times heavier than what it used to be in 2011.
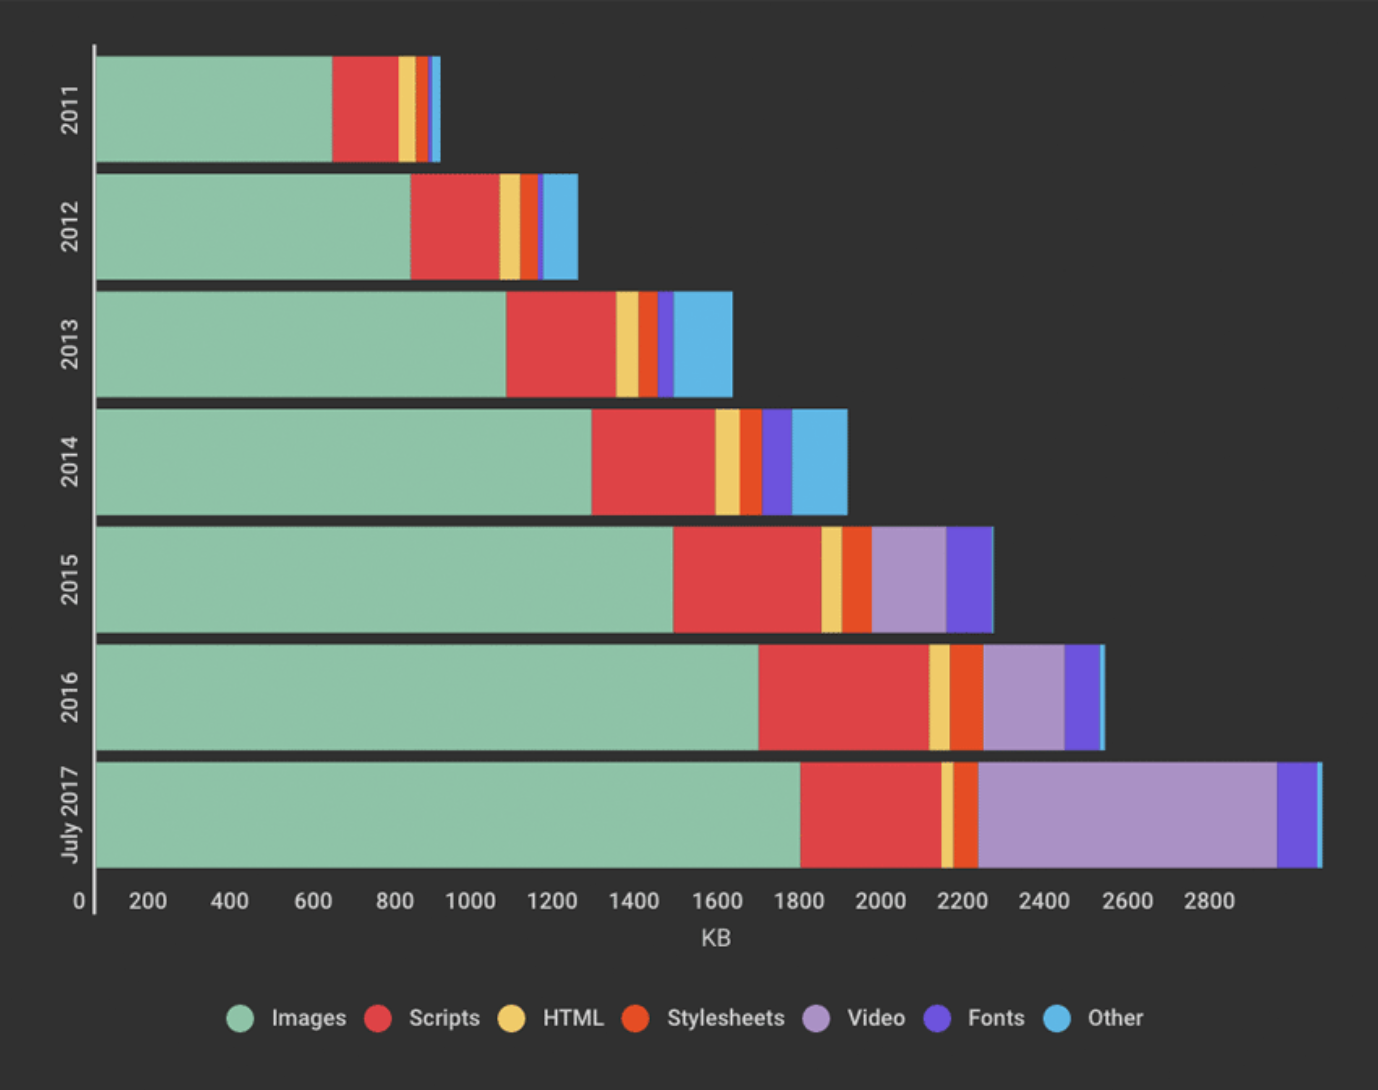
With more powerful user devices, faster networks, and the growing popularity of client-side frameworks and media-rich experiences, we have started pushing more and more data to the user’s device.
However, as developers, we miss a crucial point. We usually develop and test our websites in our offices over stable WiFi or wired connections. However, when a real-user uses our website, the network speed and stability may not be that great. Especially with more and more users coming online via mobile devices, the problem of fluctuating network conditions is even more significant.
Don’t believe it? ImageKit.io conducted a study to determine the network speed reported by the Network Info API of Chrome browser for users of a website (with visitors mostly from India). It is not very surprising that almost 40% of the visitors tracked had reported speed lower than 4G, i.e., less than 700 Kbps as per the Network Info API Spec.
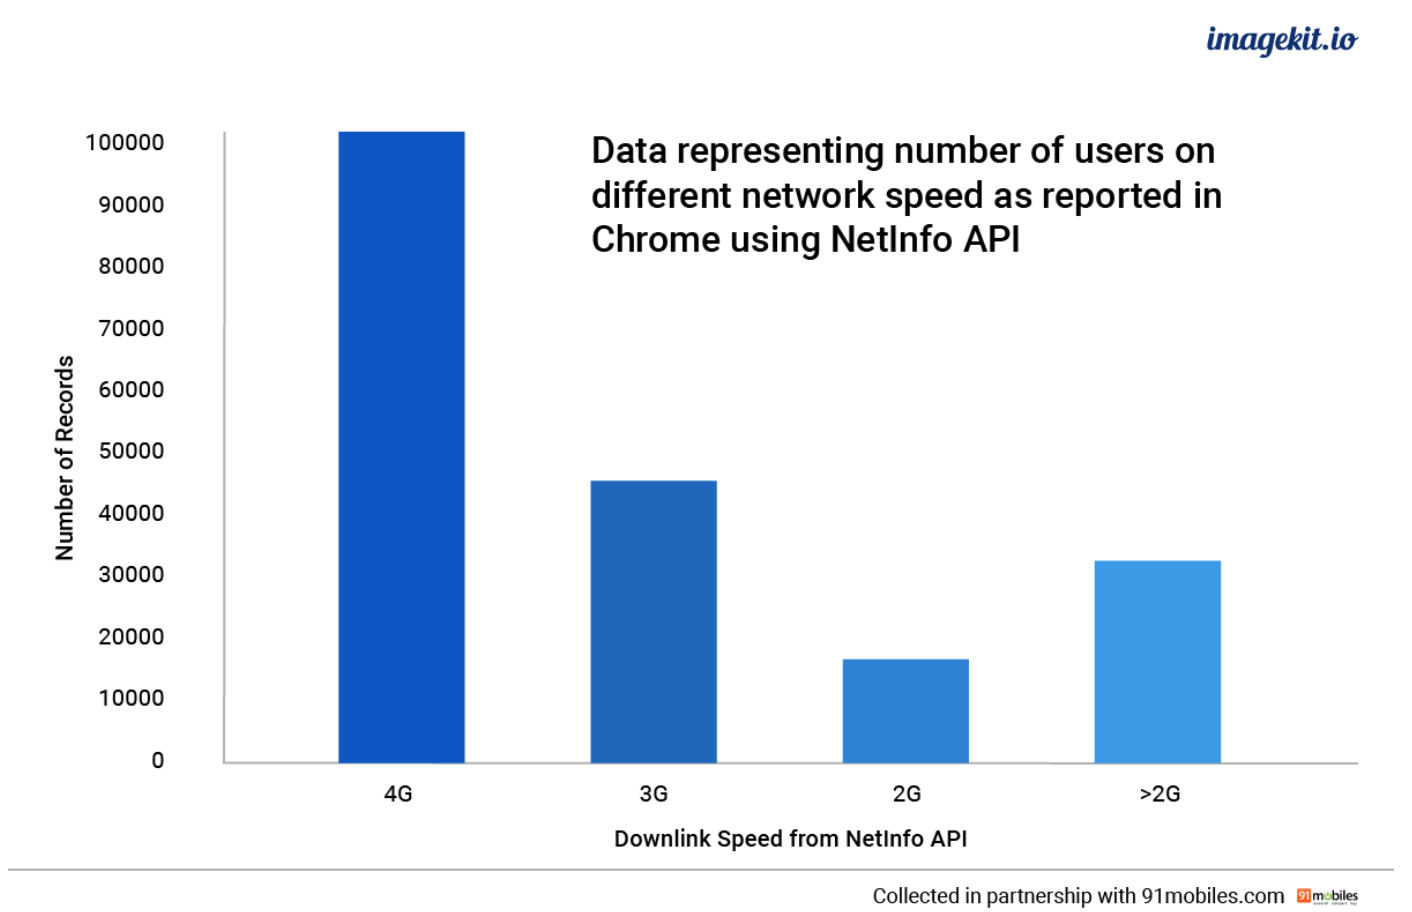
While this percentage of users experiencing poor network conditions might be lower if we get visitors from developed countries like the USA or those in Europe, we can still safely assume that varying network conditions impact a sizeable chunk of our users. And we have all experienced it as well. When we enter an elevator or move to the basement parking lot of a building or travel to a remote location, the mobile data download speeds drop significantly.
Therefore, we need to keep in mind that our users, especially the ones on mobile, will invariably try to visit our website on a slow network, and our goal as a developer should be to provide them with at least a decent browsing experience.
Why optimize images for slow networks?
The ultimate goal of optimizing a website for slower networks is to be able to serve its lighter variant. This way, all the essential stuff gets downloaded and displayed quickly on the user’s device.
Amongst all the resources that load on a webpage, images make up for most of the payload. And even if we do take care of optimizing the images in general, optimizing them further for slower networks can reduce the overall page weight by almost 30%.
Also, additional compression of images doesn’t break the critical functionality of any application. Yes, the image quality drops a bit to provide for better user experience. But unlike stripping away Javascript, which would require a lot of thought, compressing images is relatively straightforward.
How to optimize images for a slow network?
Now that we have established that optimizing our webpage based on the user’s network speed is essential and that images are the lowest-hanging fruit to get started, let’s look at how we can achieve network-based image optimization.
There are two parts of the solution.
Determine the user’s network speed
We need to determine the network speed that the user is experiencing and divide them into buckets. For example, users experiencing speed above a certain threshold should be classified in a single group and served a particular quality level of an image. This classification is simple in modern web browsers with the Network Information API. This API automatically classifies the users into four buckets - 4G, 3G, 2G, and slow 2G, with 4G being the fastest and slow 2G being the slowest.
// returns '4g', '3g', '2g' or 'slow-2g'
var effectiveType = NetworkInformation.effectiveType;
Compress the images to an appropriate quality level
The second part of the solution is to be able to alter the compression level of an image in real-time, depending on the user’s network speed determined in step 1. It should be as simple as passing an additional parameter in the image URL when the browser triggers a load for it.
While we rely on the browser to determine the user’s network speed, a tool like ImageKit.io makes the real-time compression bit simple.
ImageKit.io is a real-time image optimization and transformation product that helps us deliver images in the right format, change compression levels, resize, crop, and transform images directly from the URL and deliver those images via a global image CDN. We can get the image with the desired compression level by just passing the image quality parameter in the URL. Quality is directly proportional to image size, i.e., higher the quality number, larger will be the resulting image.
// ImageKit URL with quality 90
https://ik.imagekit.io/demo/default-image.jpg?tr=q-90

// ImageKit URL with quality 50
https://ik.imagekit.io/demo/default-image.jpg?tr=q-50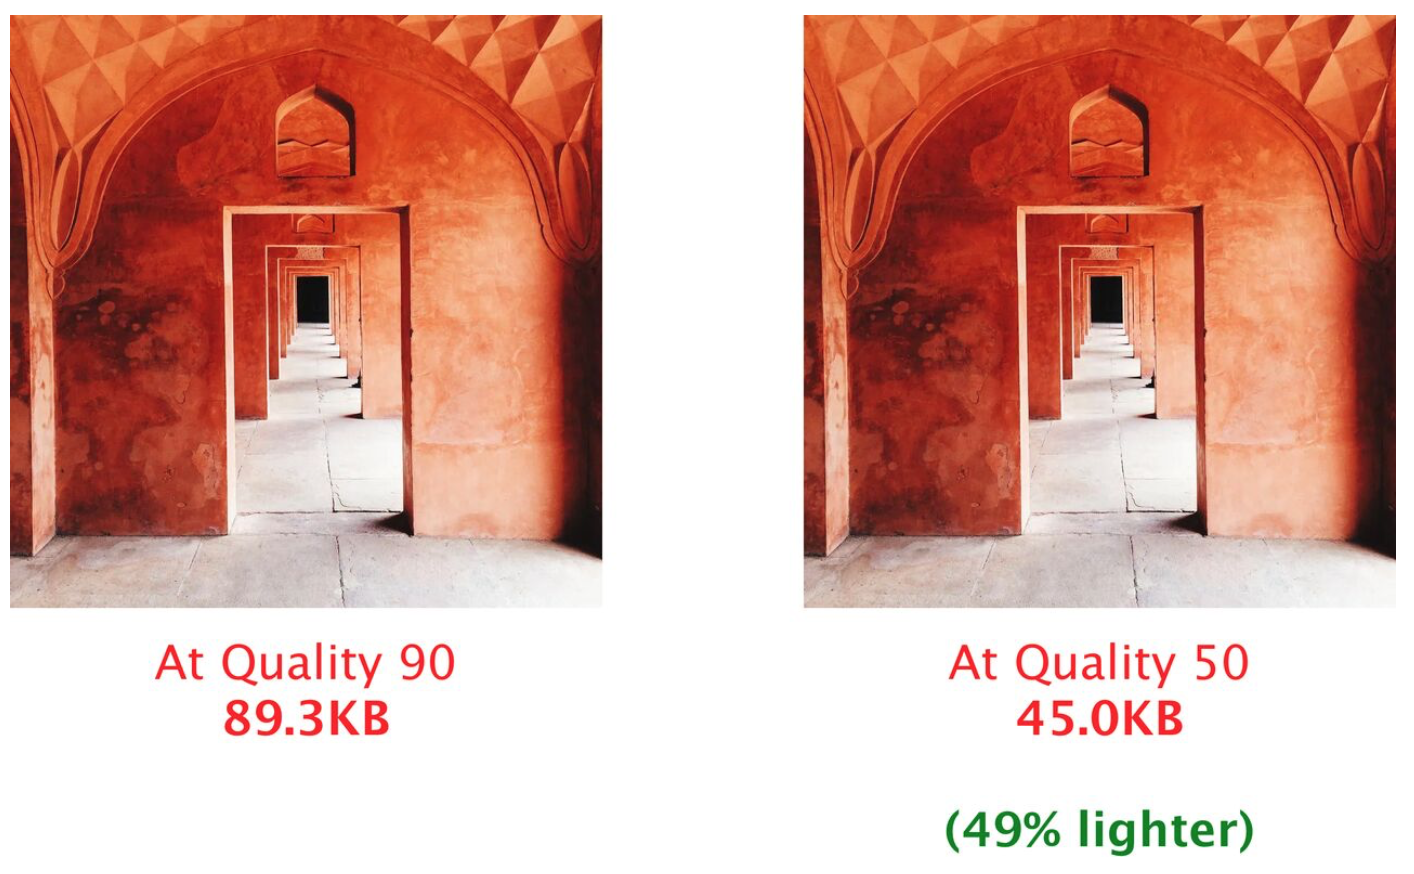
How else does ImageKit help with network-based image optimization?
While ImageKit has always supported real-time URL-based image quality modification, it has started supporting the network-based image optimization features recently. With these new features, it has become effortless to implement complete network-based optimization with minimum effort.
Of course, first, we need to sign up for ImageKit and start delivering the images on our website through it. Once this is done, in the ImageKit dashboard, we have to enable the setting for network-based image optimization. We get a code snippet right there that and add it to an existing service worker on our website or to a new service worker.
// Adding the code snippet in a service worker
importScripts("https://runtime.imagekit.io/<your_imagekit_id>/v1/js/network-based-adaption.js?v=" + new Date().getTime());
Within the dashboard itself, we also need to specify the desired quality level for different network speed buckets. For example, we have used a quality of 90 for images for users classified as 4G users and a quality of 50 for our slow 2G users. Remember that lower quality results in smaller image sizes.
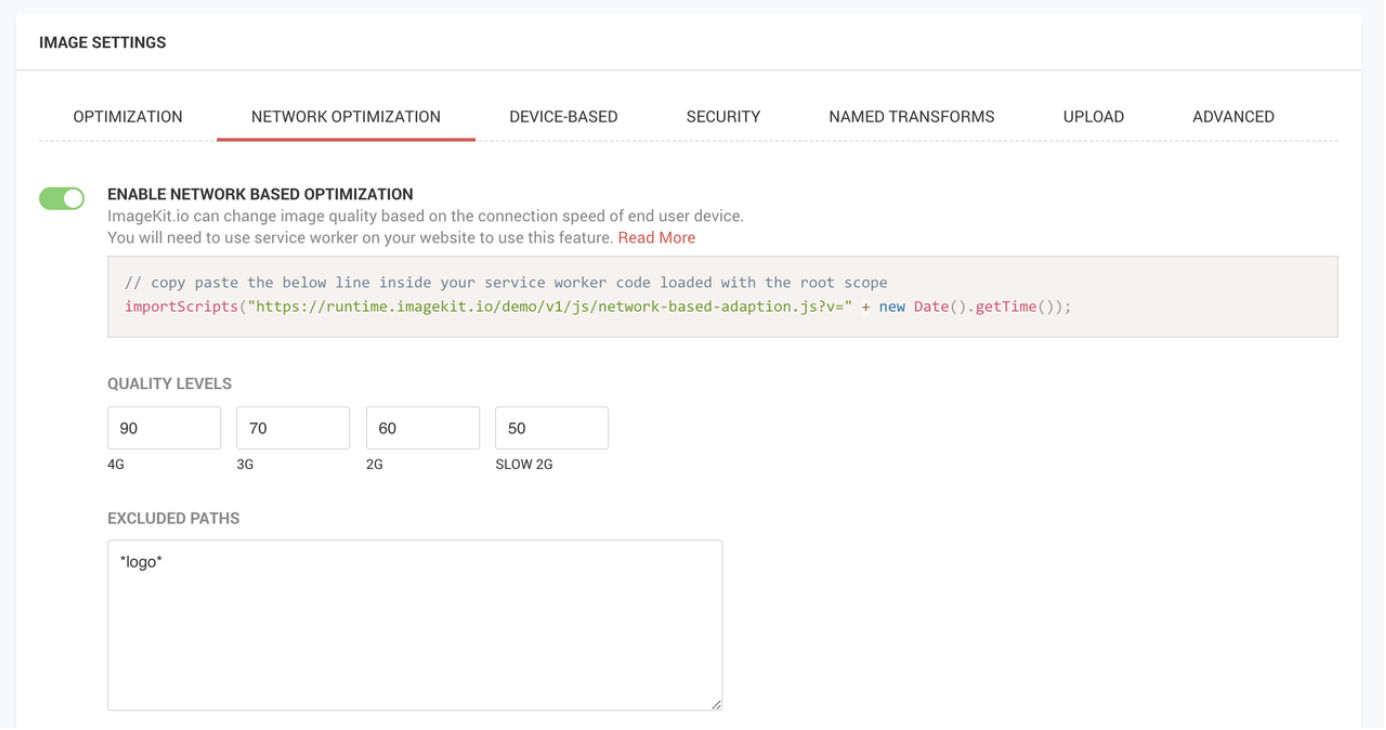
This code snippet is like a plugin meant for use in service workers. It intercepts the image requests originating from the user’s browser, detects the user’s network speed, and adds the necessary parameters to the image URL. These parameters can be understood by the ImageKit server to compress the image to the desired level and maintain efficient client-side caching. For network-based image optimization, all that we need to do is to include it on our website and done!
Additionally, in the ImageKit dashboard, we can specify the image URLs (or patterns in URLs) that should not be optimized based on the network type. For example, we would want to present the same crisp logo of our brand to our users regardless of their network speed.
Verifying the setup
Once set up correctly, we can quickly check if the network-based optimization is working using Chrome Developer Tools. We can emulate a slow network on our browser using the developer tools. If set up correctly, the service worker should add some parameters to the original image request indicating the current network speed. These parameters are understood by ImageKit’s servers to compress the image as per the quality settings specified in our ImageKit dashboard corresponding to that network speed.

How does caching work with the service worker in place?
ImageKit’s service worker plugin by-passes the browser cache in favor of network-based image cache in the browser. By-passing the browser cache means that the service worker can maintain different caches for different network types and choose the correct image from the cache or request a new one based on the user’s current network condition.

The service worker plugin automatically uses the cache-first technique to load the images and also implements a waterfall method to pick the right one from the cache. With this waterfall method, images at higher quality get preference over images at a lower quality. What it means is that, if the user’s speed drops to 2G and he has a particular image cached from the time when he was experiencing good download speed on a 4G network, the service worker will use that cached 4G image for delivery instead of downloading the image over the 2G network. But the reverse is not valid. If the user is experiencing 4G network speeds, the service worker won’t pick up the 2G image from the cache, because it is possible to fetch a better quality image and the resources allow for it.
And there is more!
Apart from a simple, ready-to-use service worker plugin and dashboard settings, ImageKit has a few more things to offer that make it an attractive tool to get started with network-based optimization.
Analytics
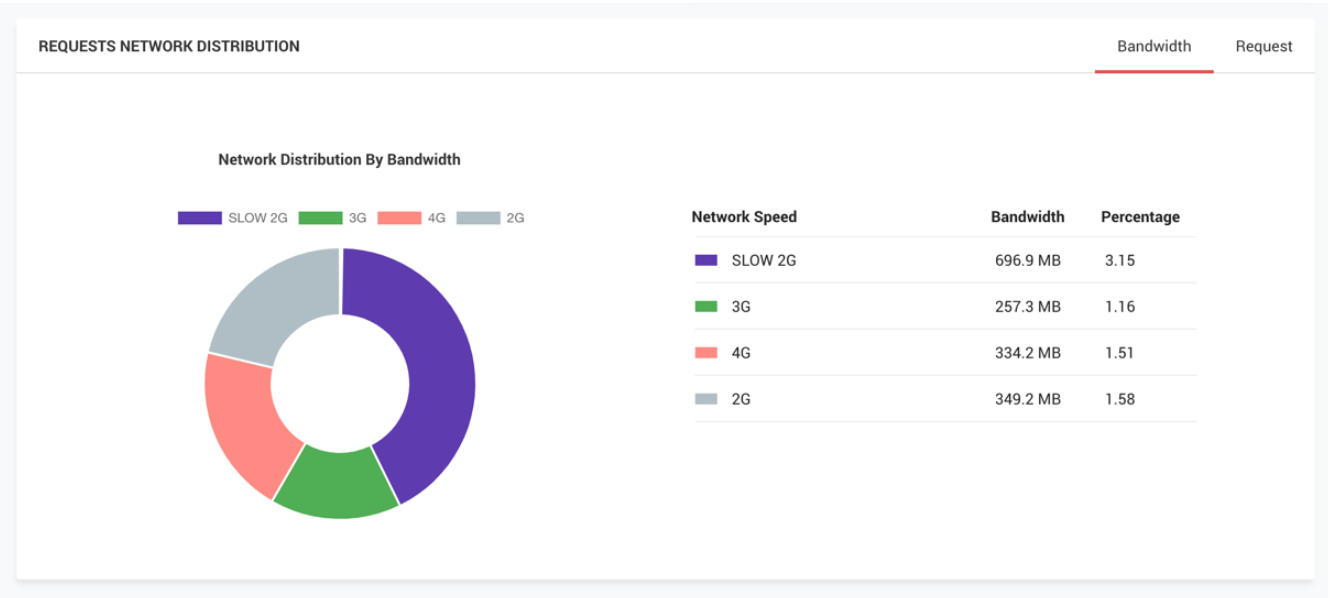
ImageKit provides us with analytics on our user’s observed network type. It gives us an insight into the number of times network-based optimization gets triggered and what does the user distribution look like across different network types. This distribution analysis can be helpful even for optimizing other resources on our website.
Cost of optimization
With network-based image optimizations, the size of the images goes down, but at the same time, the number of transformation requests can potentially go up. Unlike a lot of other real-time image optimization products out there, ImageKit’s pricing is based only on the output image bandwidth and nothing else. So with the favorable pricing model, implementing network-based image optimization not only provides a lot more value to our users but also helps us cut down on image delivery costs.
Conclusion
Improving page load performance is essential. However, there is one bit that we have all been missing - optimizing it for slow networks.
Images present an easy start when it comes to optimizing our entire website for different networks. With the support of network-based optimization features via service workers, it has become effortless to achieve it with ImageKit.
It will be a great value add for our users and will help to improve the user experience even further, which will have a positive impact on the conversions on our website.
Sign up now for ImageKit and get started with it now!
The post Optimizing Images for Users with Slow Network Speeds appeared first on CSS-Tricks.